Deploy ASP.NET Web Application with SQL Database and Entity Framework to Azure
In this video we will discuss, how to deploy ASP.NET Web Application with SQL Server Database and Entity Framework to Azure.
You can download "Quotes" sample project from the following link. Please download Quotes.zip file.
https://drive.google.com/drive/folders/1z49q-8xkKu8N8VjdemYKTs_4IbzBeLWM
In Part 21 of this video series we discussed how to deploy ASP.NET Web Application that does not use a database to Azure. This is a one step process. Using visual studio Publish feature, we create an App Service and App Service Plan in Azure and then hit the Publish button to have our code deployed in azure. With just a few clicks, in just a few minutes we have our app up and running in azure.
In Part 22 of this video series we discussed how to deploy ASP.NET Web Application that uses SQL Server database and ADO.NET as the data access framework. This is a 3 step process. First, deploy the web application itself. Second, create SQL Server and the database. Finally create the database objects like tables, views, stored procedure etc and seed the database tables with initial application data.
In this video we will discuss, how to deploy ASP.NET Web Application with SQL Server Database and Entity Framework as the data access framework to Azure. The following application retrieves and displays inspiration quotes from a sql server database.
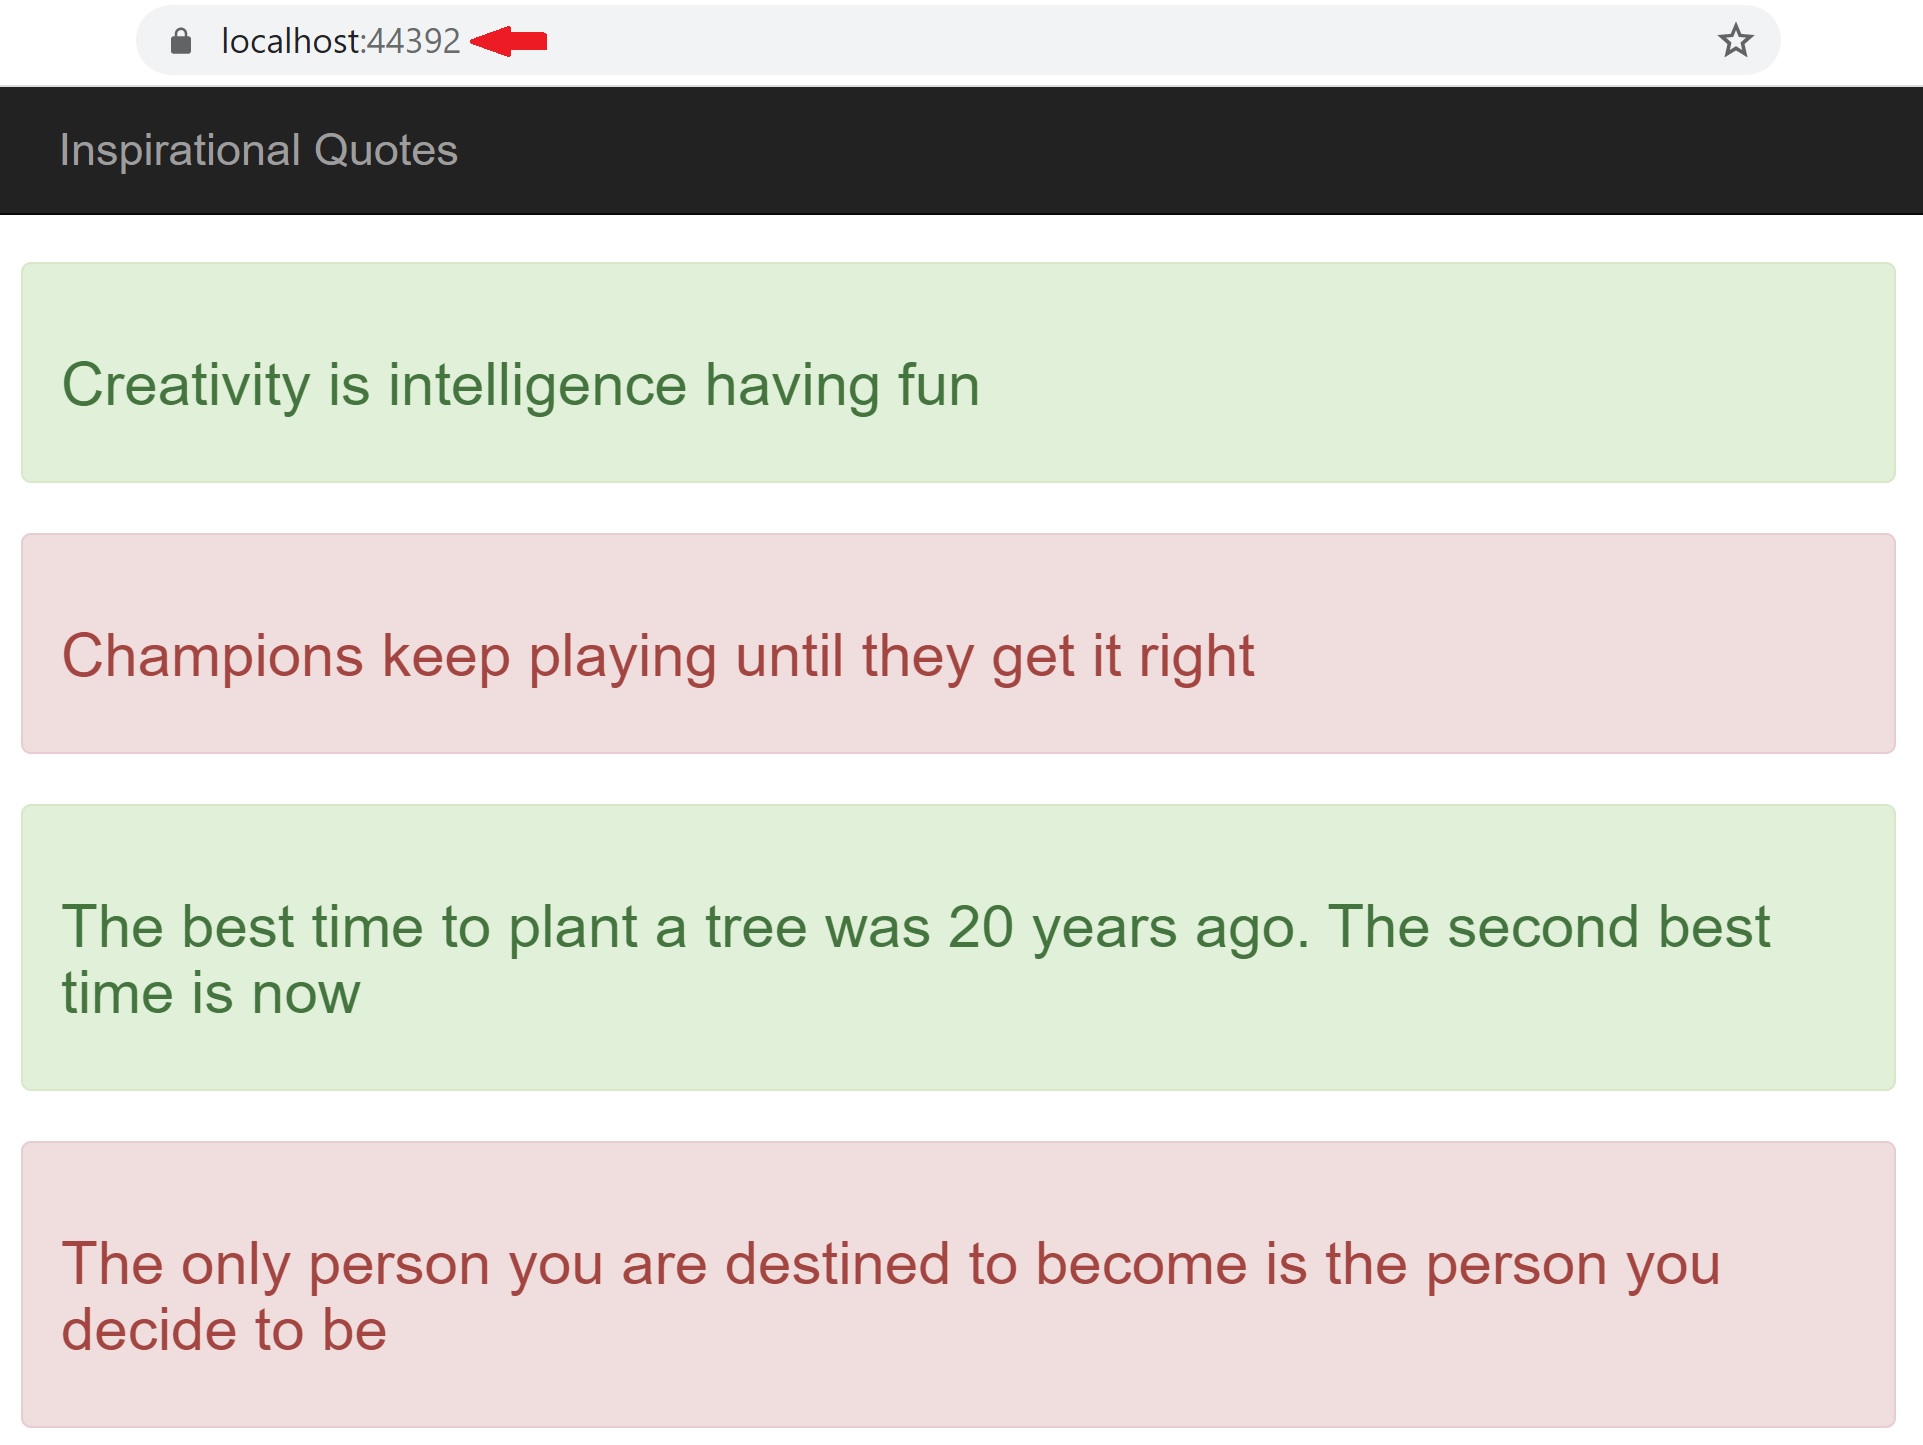
We are using entity framework as the data access framework. If you are new to entity framework, please check out our Entity Framework tutorial. At the moment, as you can see from the URL, this app is running on my local development machine.
This is a very simple application. The following are the steps to follow, if you want to create the same application. I am using Visual Studio 2019.
Create a new ASP.NET Web Forms application. Name it Quotes.
Connection String in Web.config
In web.config file include the following database connection string. As you can see from the connection string in web.config file, I am using SQL Server localDB on my local machine which is free. You can use a full blown sql server if you want. The process is still the same.
<connectionStrings>
  <add name="QuoteDBContext"
        connectionString="Data Source=(localdb)\MSSQLLocalDB;Initial Catalog=QuotesDB;Integrated Security=True;Connect Timeout=30;Encrypt=False;TrustServerCertificate=False;ApplicationIntent=ReadWrite;MultiSubnetFailover=False"
        providerName="System.Data.SqlClient"/>
</connectionStrings>
Quote Class
Add Quote.cs class file to the project and include the following code.
namespace Quotes
{
    public class Quote
    {
        public int Id { get; set; }
        public string QuoteText { get; set; }
    }
}
QuoteDBContext class
Add QuoteDBContext.cs class file to the project and include the following code.
using System.Data.Entity;

namespace Quotes
{
    public class QuoteDBContext : DbContext
    {
        public DbSet<Quote> Quotes { get; set; }
    }
}
QuoteRepository class
Add QuoteRepository.cs class file to the project and include the following code.
using System.Collections.Generic;
using System.Linq;

namespace Quotes
{
    public class QuoteRepository
    {
        public List<Quote> GetQuotes()
        {
            QuoteDBContext quoteDBContext = new QuoteDBContext();
            return quoteDBContext.Quotes.ToList();
        }
    }
}
QuoteDBContextSeeder class
Add QuoteDBContextSeeder.cs class file to the project and include the following code.
using System.Data.Entity;

namespace Quotes
{
    public class QuoteDBContextSeeder : DropCreateDatabaseIfModelChanges<QuoteDBContext>
    {
        protected override void Seed(QuoteDBContext context)
        {
            Quote q1 = new Quote()
            {
                Id = 1,
                QuoteText = "Creativity is intelligence having fun"
            };

            Quote q2 = new Quote()
            {
                Id = 2,
                QuoteText = "Champions keep playing until they get it right"
            };

            Quote q3 = new Quote()
            {
                Id = 3,
                QuoteText = "The best time to plant a tree was 20 years ago. The second best time is now"
            };

            Quote q4 = new Quote()
            {
                Id = 4,
                QuoteText = "The only person you are destined to become is the person you decide to be"
            };

            Quote q5 = new Quote()
            {
                Id = 5,
                QuoteText = "Believe you can and you’re halfway there"
            };

            context.Quotes.Add(q1);
            context.Quotes.Add(q2);
            context.Quotes.Add(q3);
            context.Quotes.Add(q4);
            context.Quotes.Add(q5);

            base.Seed(context);
        }
    }
}
Global.asax.cs
In Application_Start() method, call Database.SetInitializer() method as shown below.
using System;
using System.Data.Entity;
using System.Web;
using System.Web.Optimization;
using System.Web.Routing;

namespace Quotes
{
    public class Global : HttpApplication
    {
        void Application_Start(object sender, EventArgs e)
        {
            // Code that runs on application startup
            RouteConfig.RegisterRoutes(RouteTable.Routes);
            BundleConfig.RegisterBundles(BundleTable.Bundles);

            Database.SetInitializer(new QuoteDBContextSeeder());
        }
    }
}
Default.aspx
<%@ Page Title="Home Page" MasterPageFile="~/Site.Master" AutoEventWireup="true"
    Language="C#" CodeBehind="Default.aspx.cs" Inherits="Quotes._Default" %>

<asp:Content ID="BodyContent" ContentPlaceHolderID="MainContent" runat="server">
    <div style="padding-top: 20px">
        <asp:Repeater ID="repeaterQuotes" runat="server">
            <ItemTemplate>
                <div class="alert alert-success" role="alert">
                    <h3><%#Eval("QuoteText") %></h3>
                </div>
            </ItemTemplate>
            <AlternatingItemTemplate>
                <div class="alert alert-danger" role="alert">
                    <h3><%#Eval("QuoteText") %></h3>
                </div>
            </AlternatingItemTemplate>
        </asp:Repeater>
    </div>
</asp:Content>
Default.aspx.cs
using System;
using System.Web.UI;

namespace Quotes
{
    public partial class _Default : Page
    {
        protected void Page_Load(object sender, EventArgs e)
        {
            QuoteRepository quoteRepository = new QuoteRepository();

            repeaterQuotes.DataSource = quoteRepository.GetQuotes();
            repeaterQuotes.DataBind();
        }
    }
}
Deploying this application to azure is a 2 step process. First, deploy the web application itself. We discussed how to do this in detail in Part 21 of this video series. Next, create SQL Server and the database in azure. We can very easily achieve this using visual studio publish feature. The following are the steps.
Step 2 : Create SQL Server in Azure
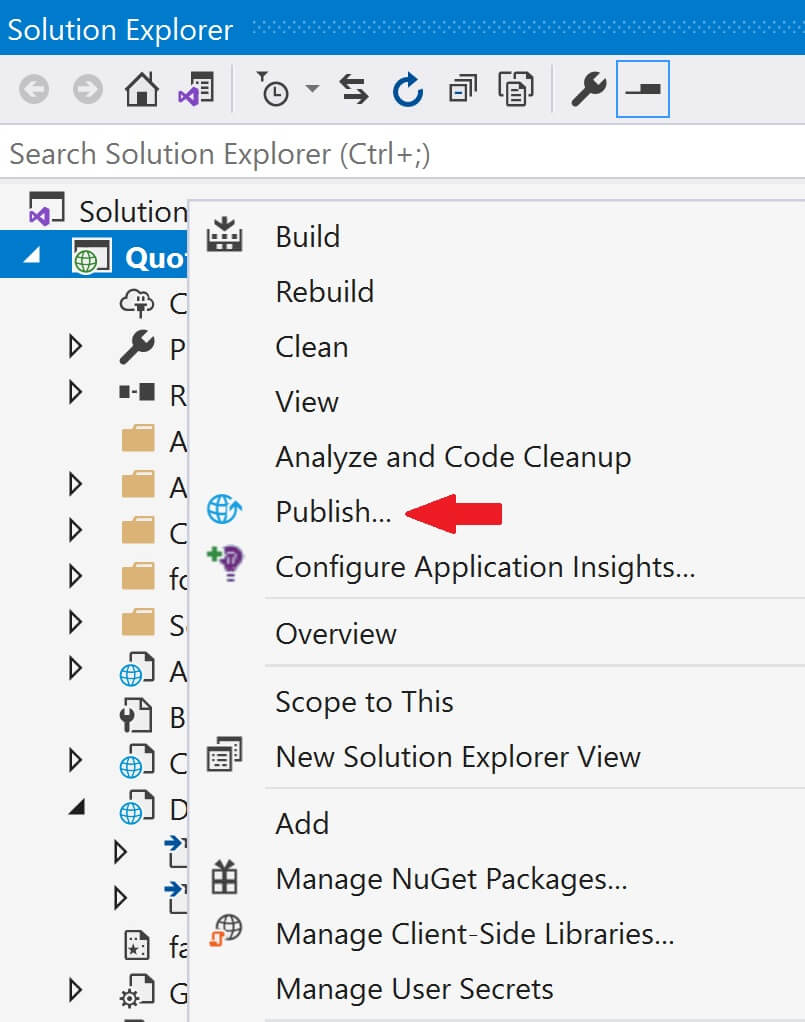
There are several ways to do this. We can do it directly in the azure portal or through visual studio. For this example, let's do it through Visual Stduio. Go to the Publish page in Visual Studio. To do this, right click on the web application project in Visual Studion and select Publish from the context menu.
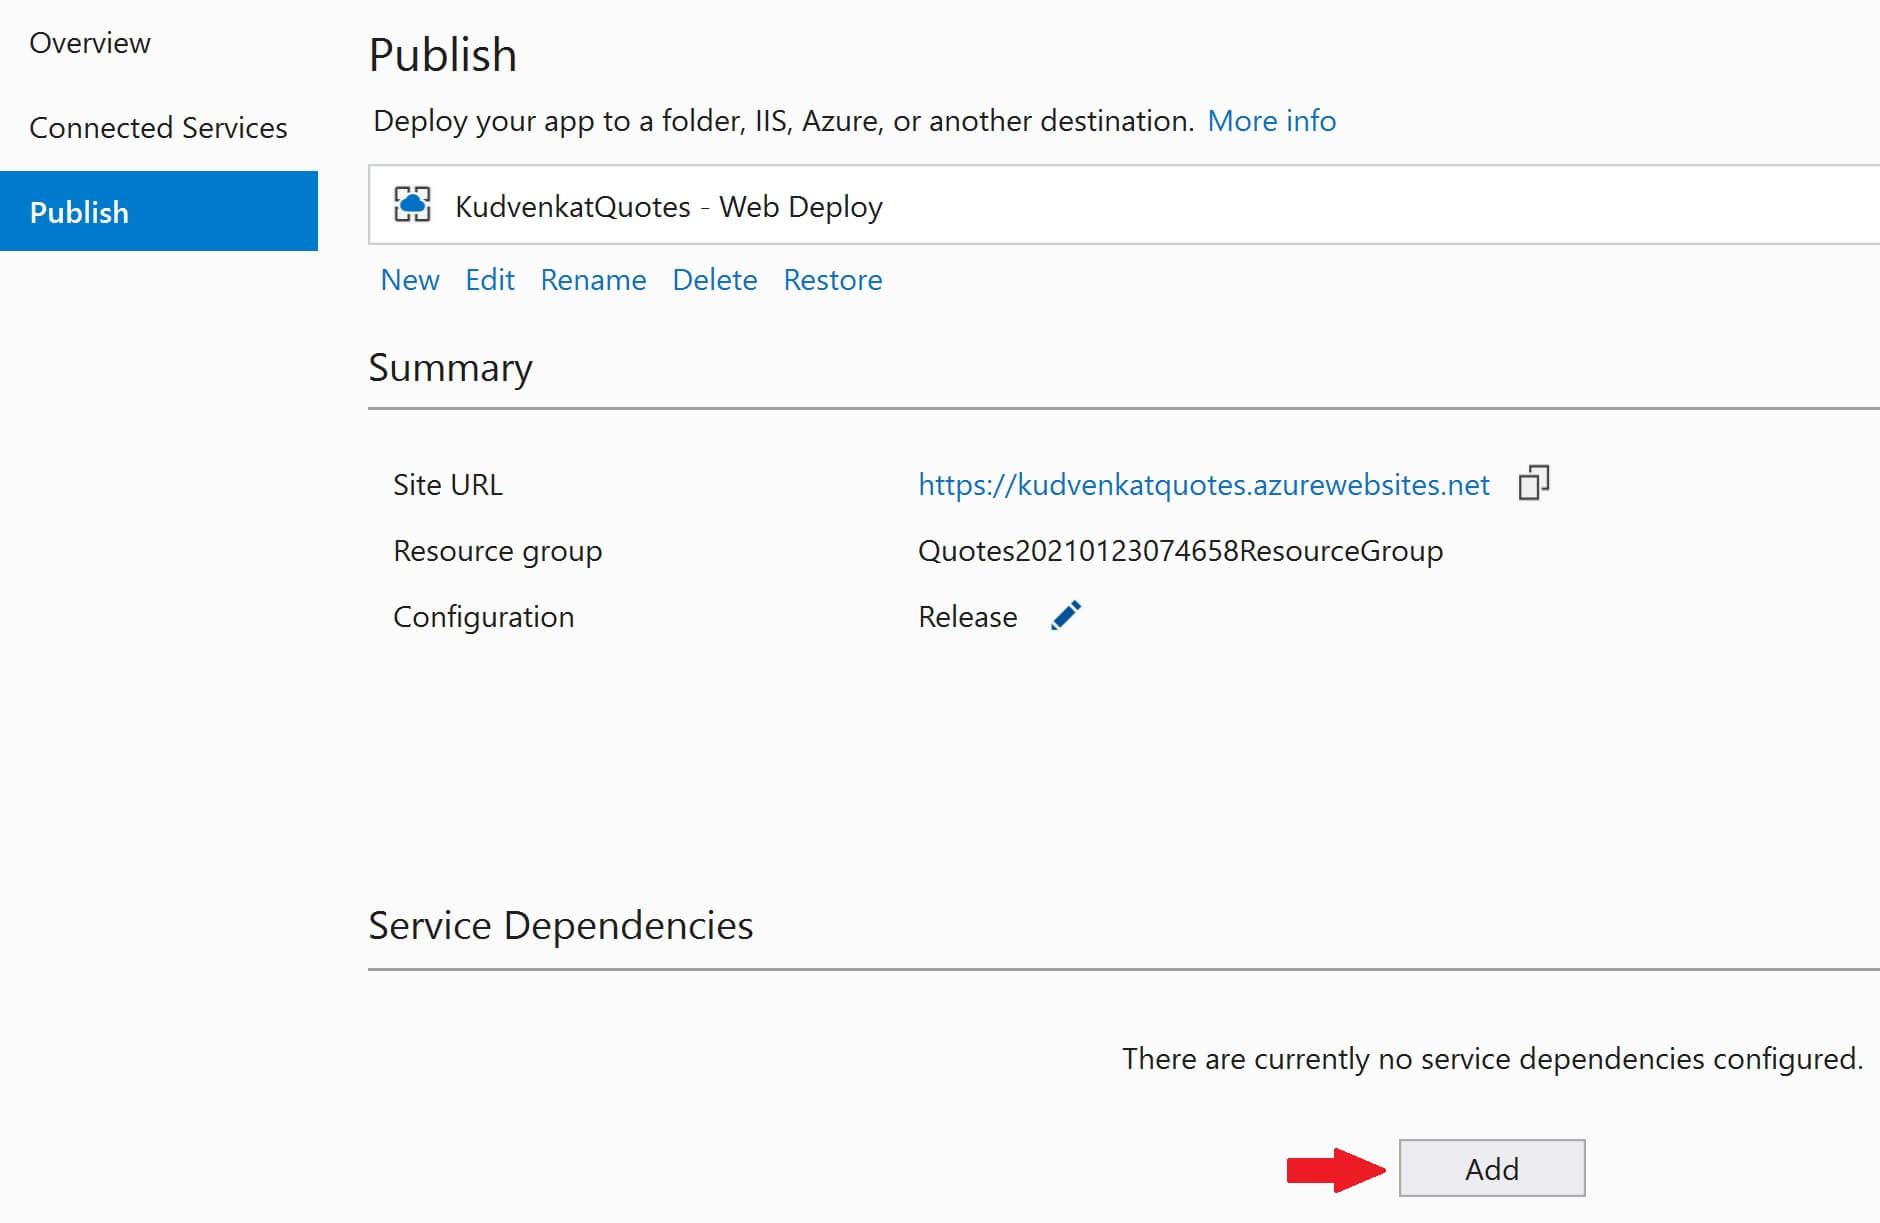
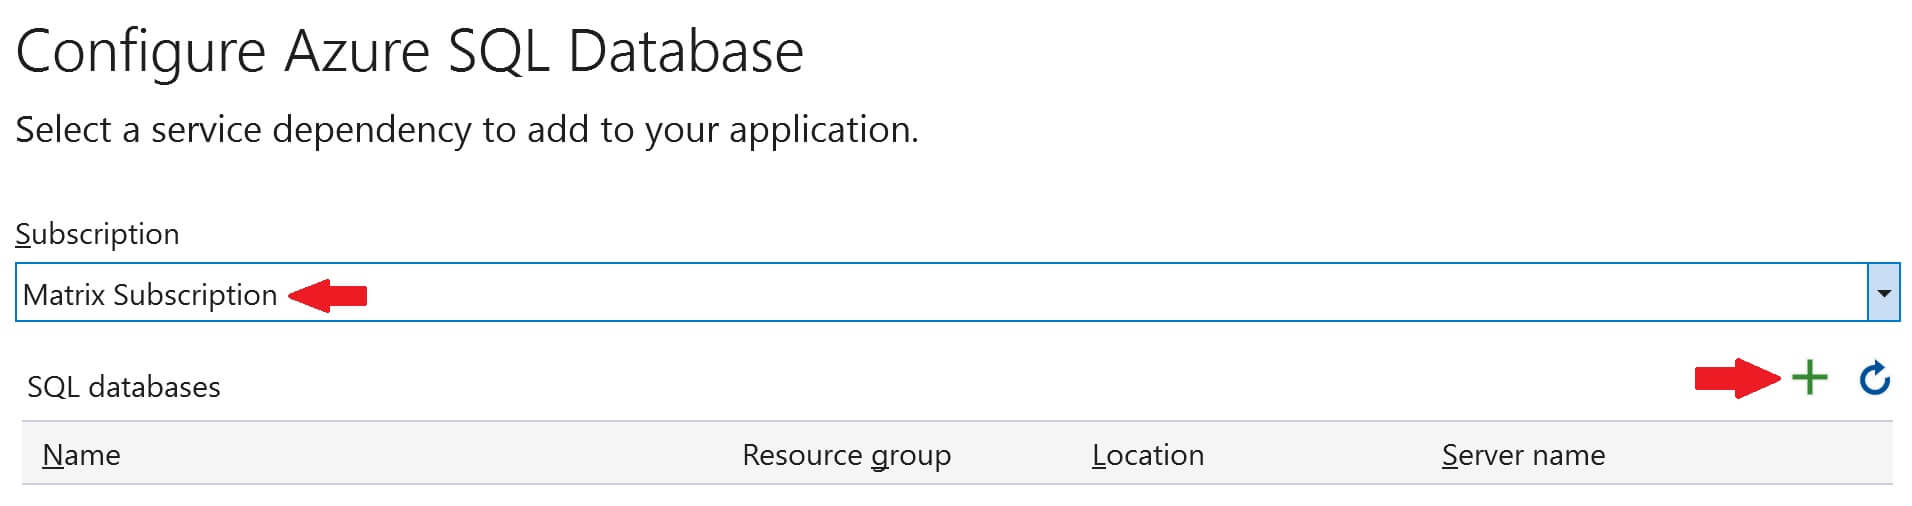
Under Service Dependencies, click the Add button to add SQL Server dependency.
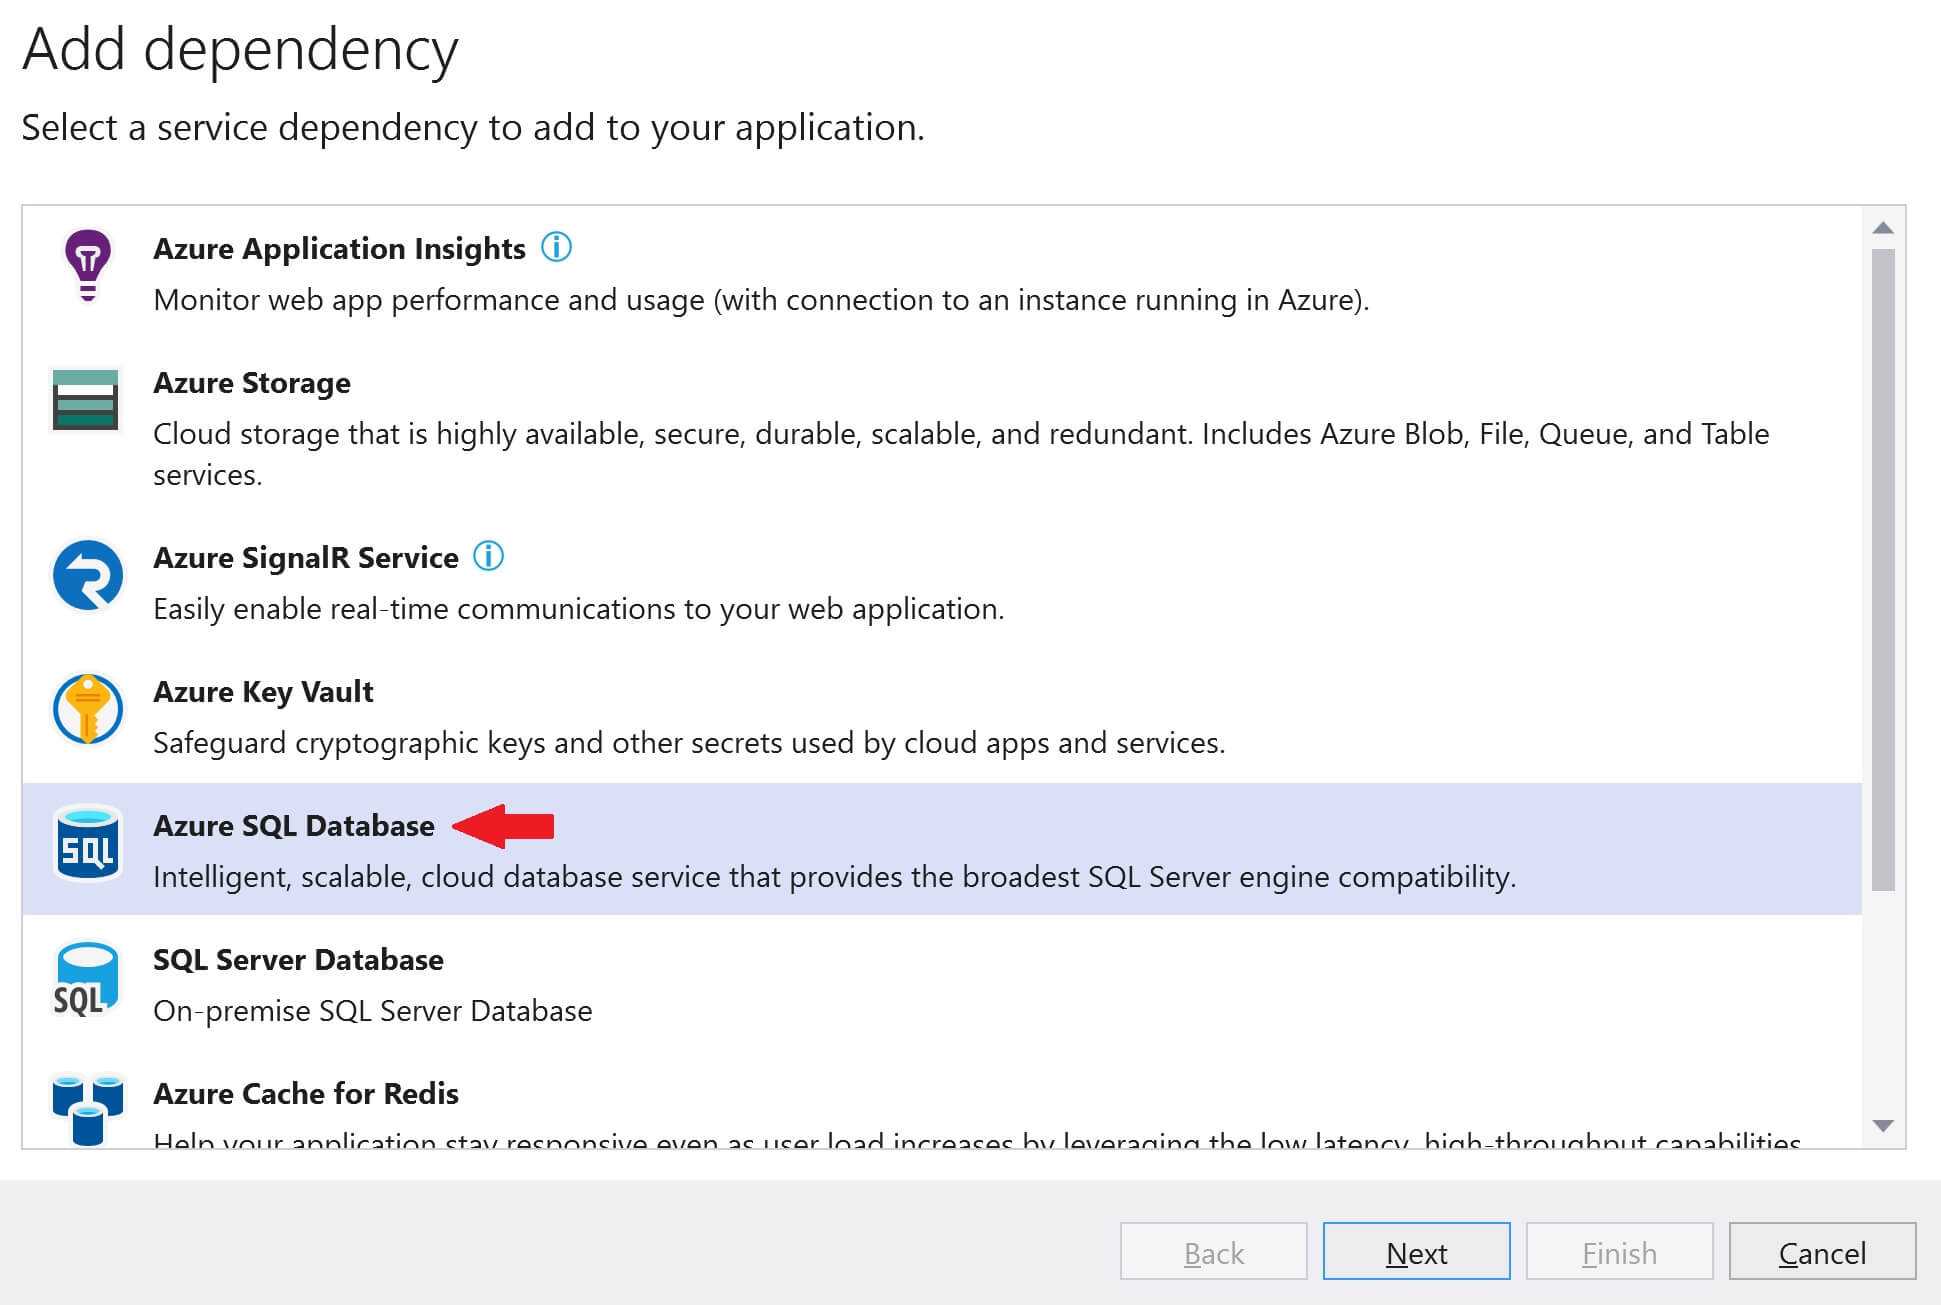
Select Azure SQL Database and click Next
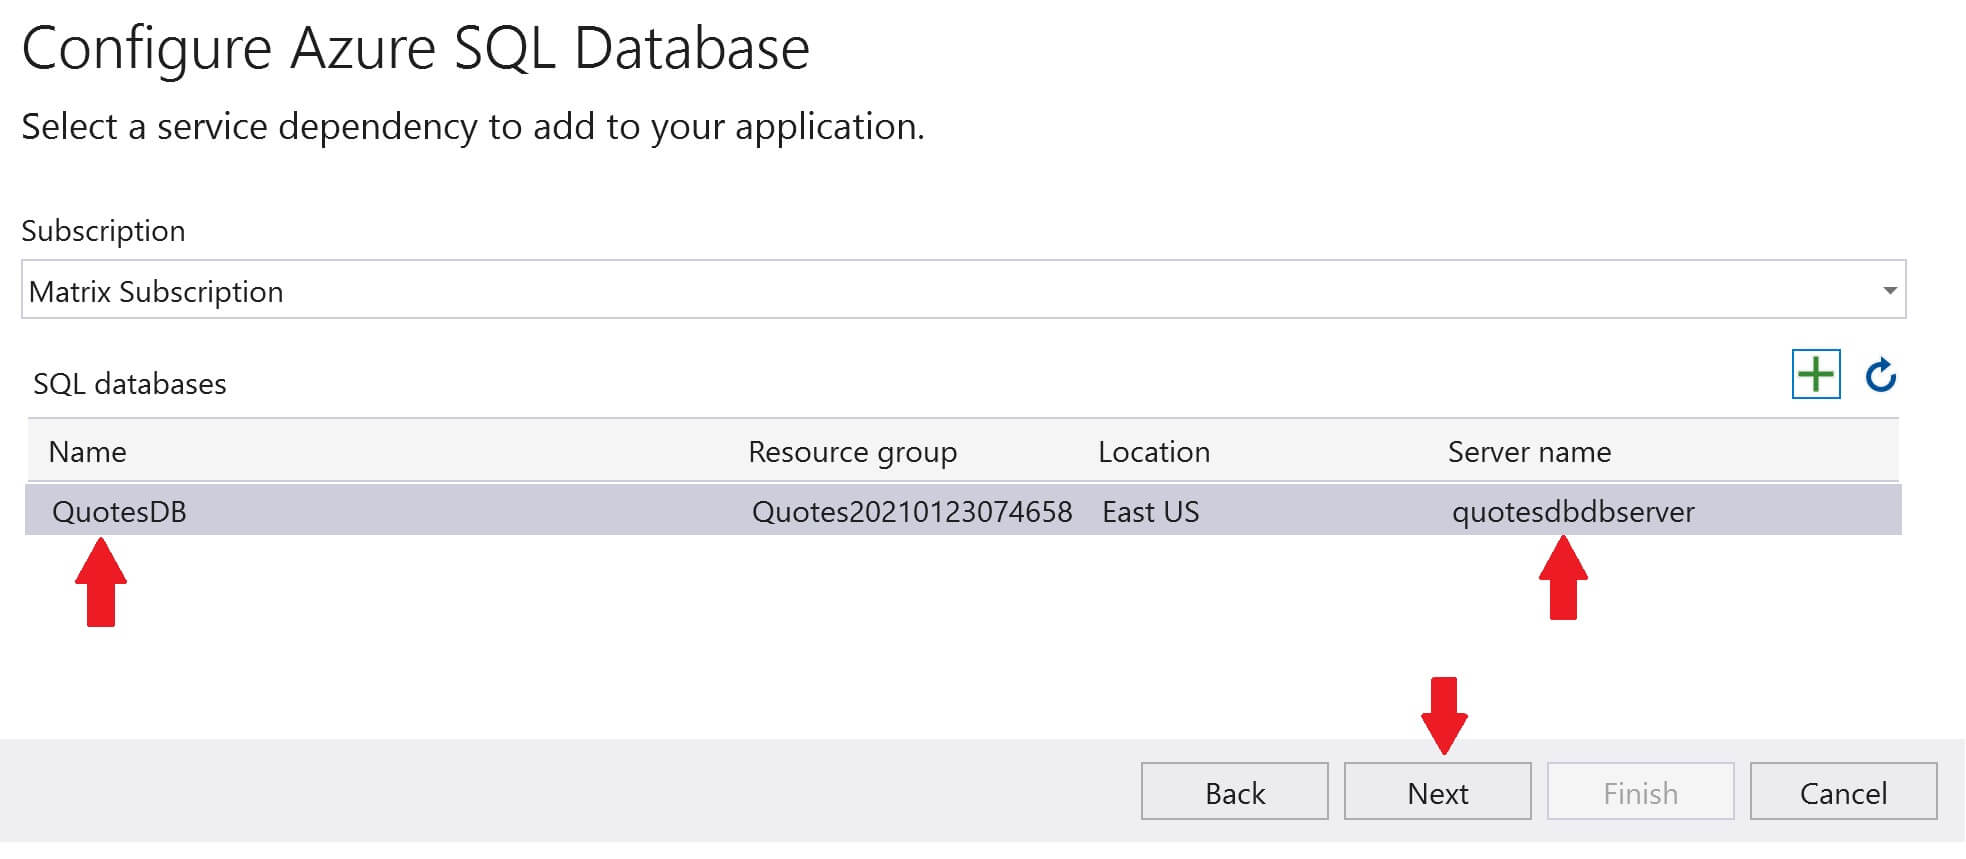
Select your azure subscription from the Subscription dropdownlist and then click on the + sign to create a new SQL Database in Azure.
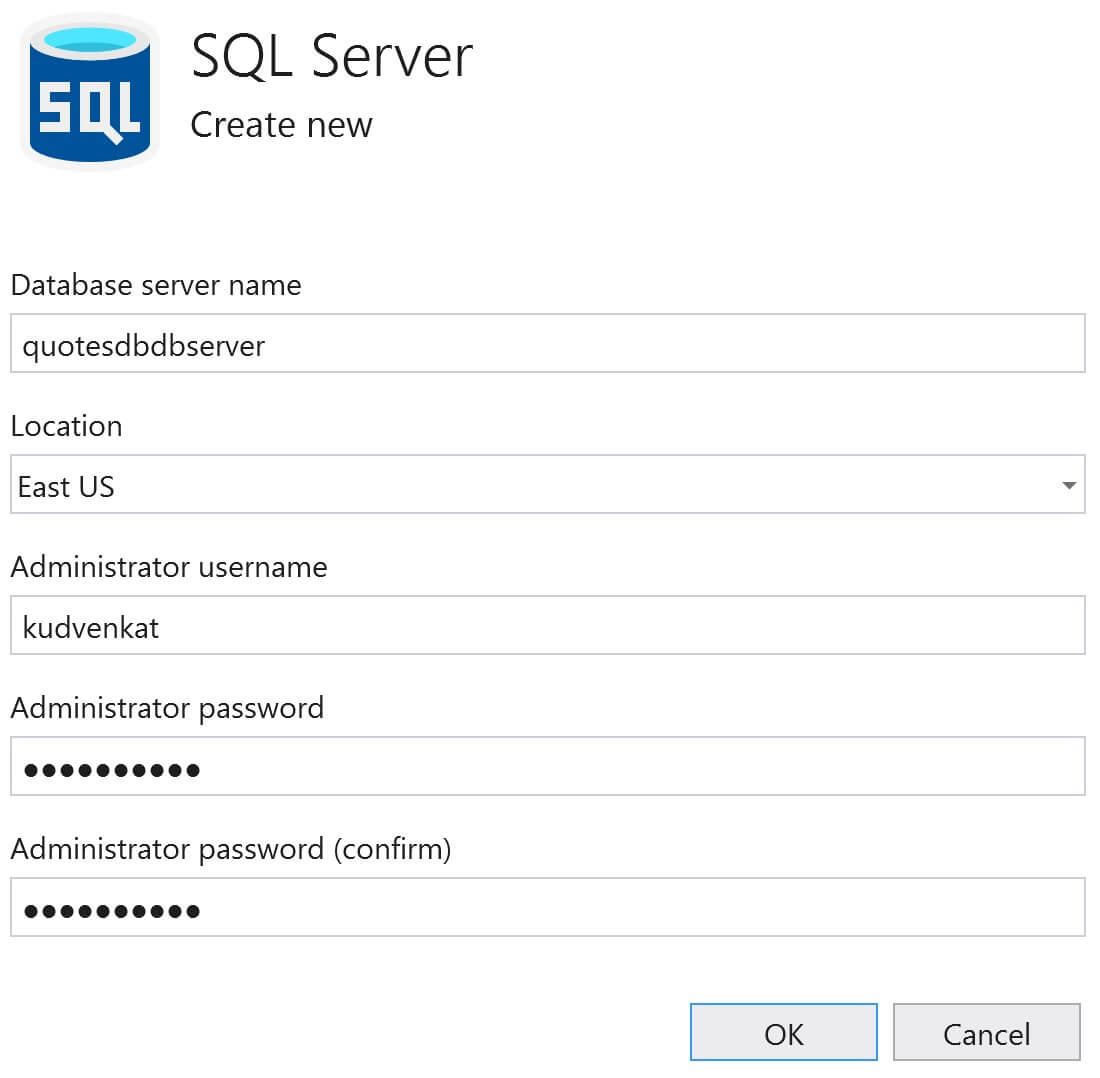
Before we can create a database, we need to create a database server. So, click on the New link, next to Database server dropdownlist.
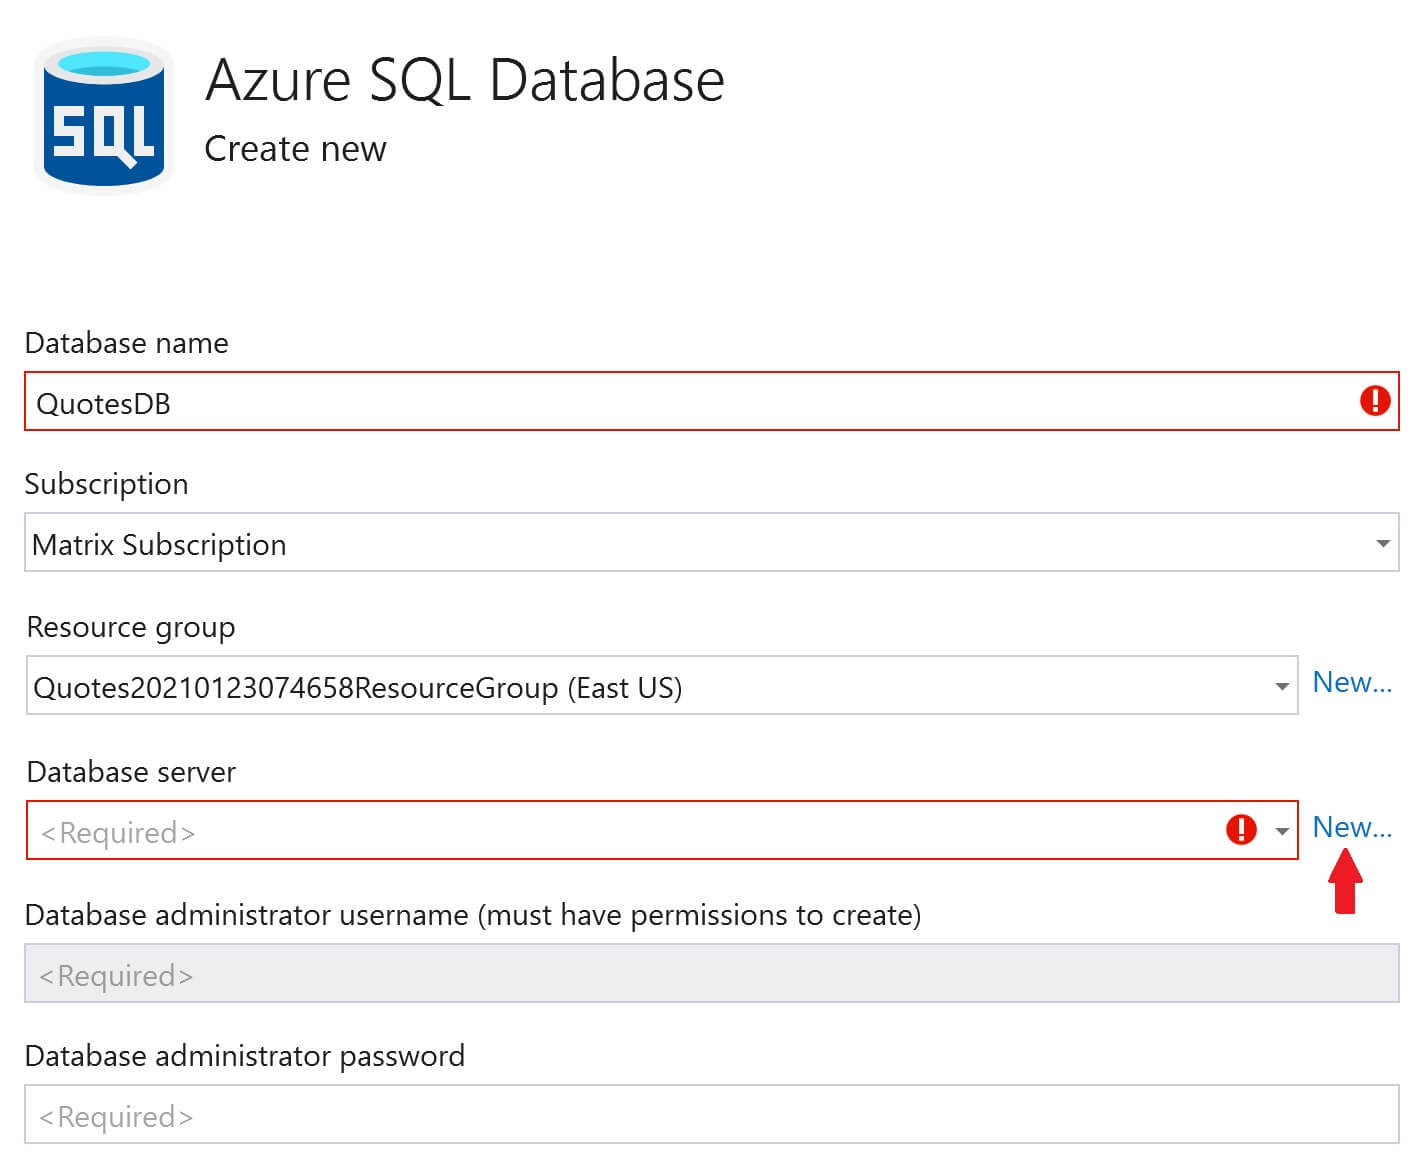
Fill the following details and click OK
- Database server name
- Location (Azure Region) where you want the server to be created
- Administrator username and password
You will be back on Azure SQL Database window. Click Create. This creates both - Database server and the database itself.
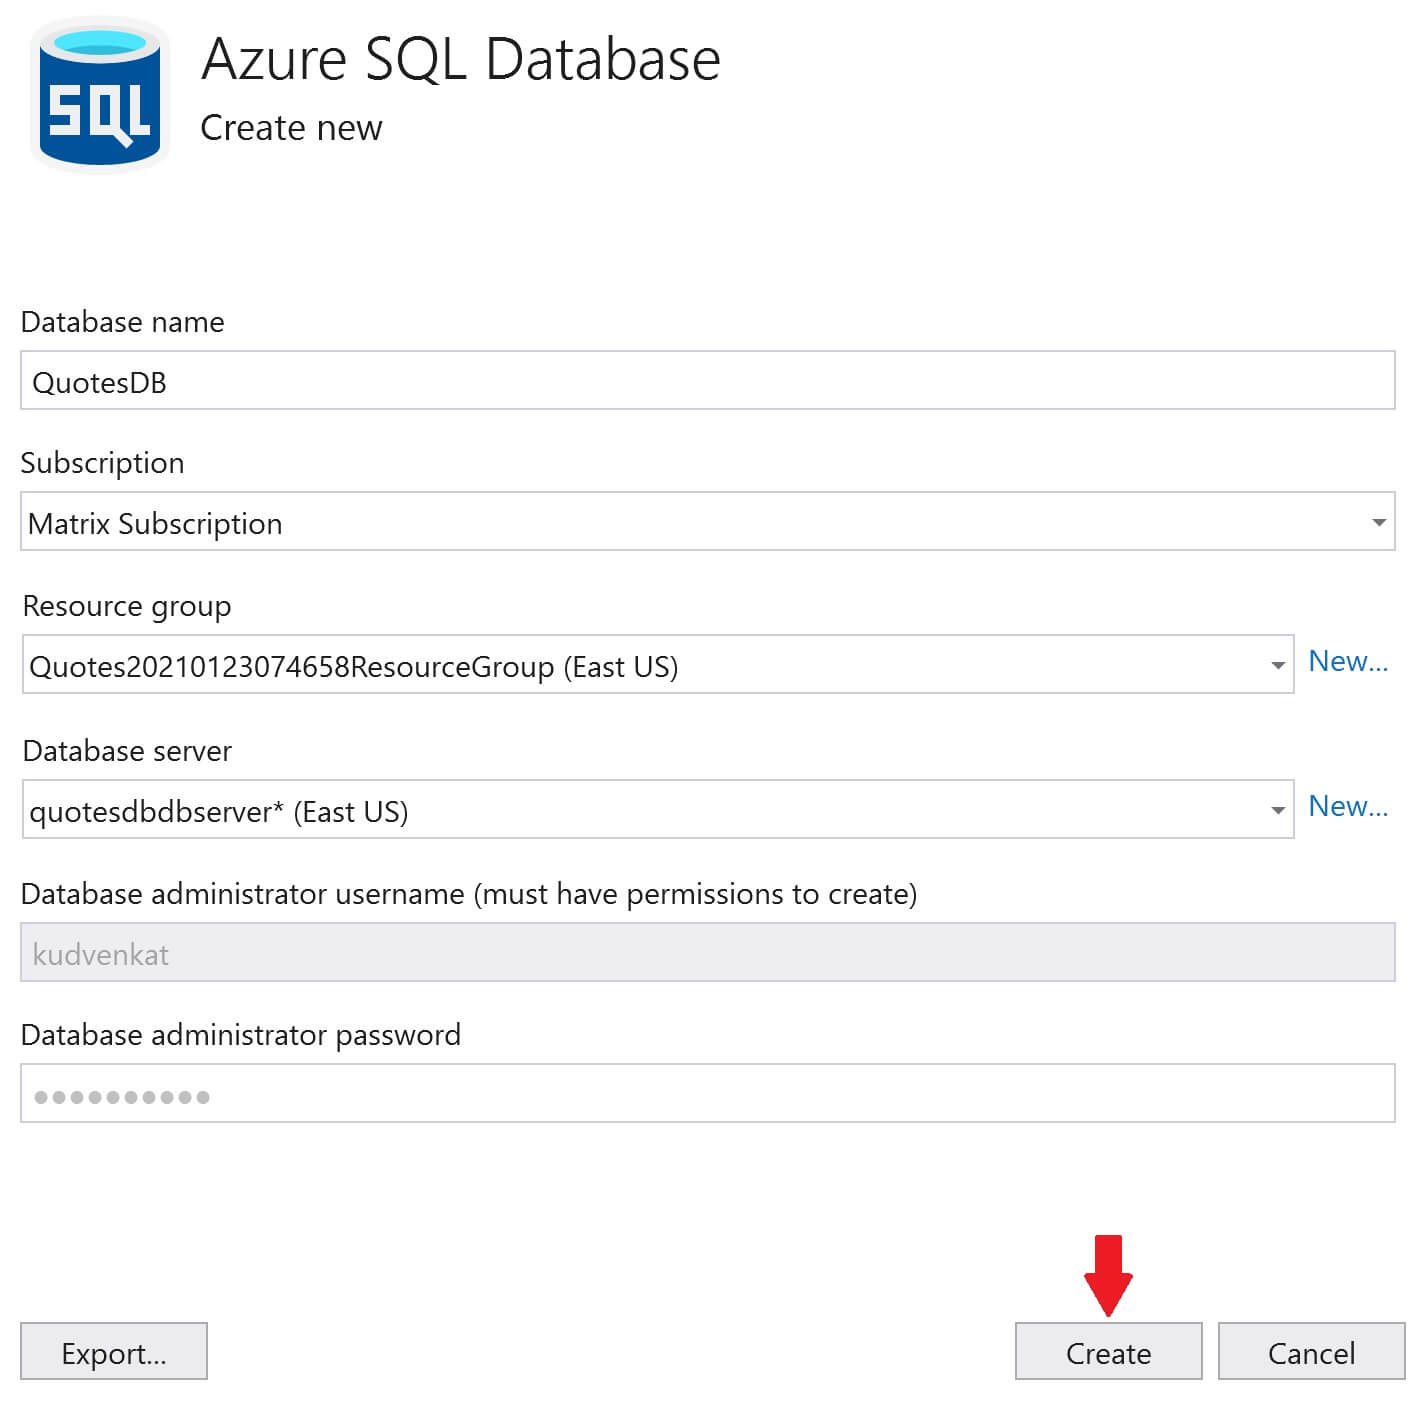
Both the database server and the database are now created in azure. Click Next.
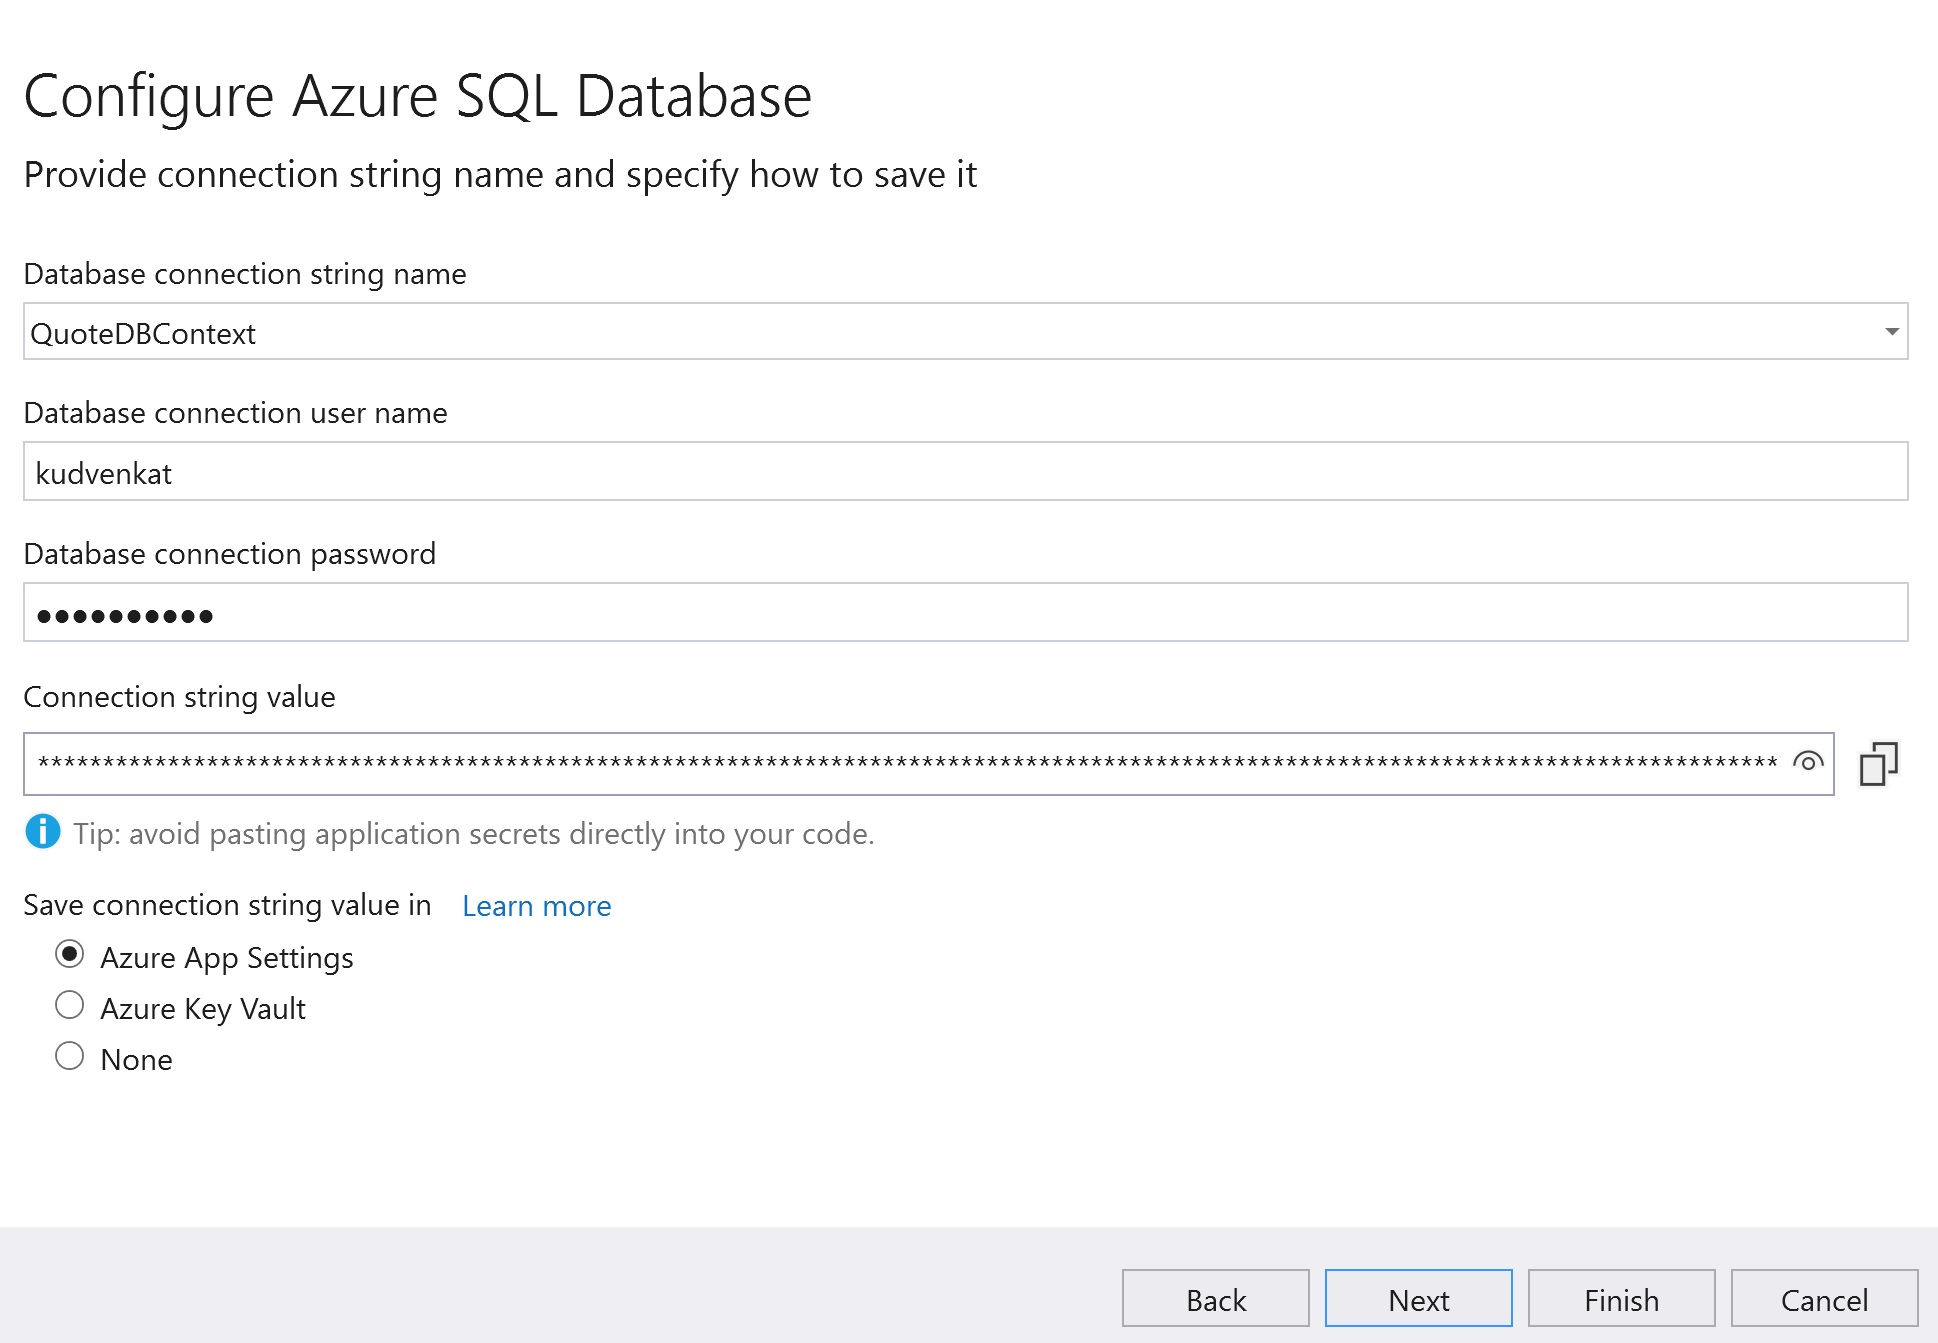
Specify the Database connection string, user name and password. This connection will be used by the web application to connect to the sql server database in azure. Click Next and then Finish.
Finally click the Publish button on the Publish window. At this point, you should have your app up and running in azure. With Entity Framework, we do not have to manually create database tables and seed them with initial data. This is done for us automatically by the Entity Framework DBContextSeeder class.


© 2020 Pragimtech. All Rights Reserved.