Routing
In this article, we will introduce ourselves to a Concept Called as Routing and we will also understand how to use Routing in our React Projects.
What is Routing?
we know that Components are the basic building blocks of our react applications. We will be developing multiple components as Part of working on any Project, like how we have created Employee Component, Department Component and Project Components.
When we create multiple components, we don’t show all these components together to the User.
we change what the user sees by showing or hiding portions of the display that correspond to particular components based on User Activities.
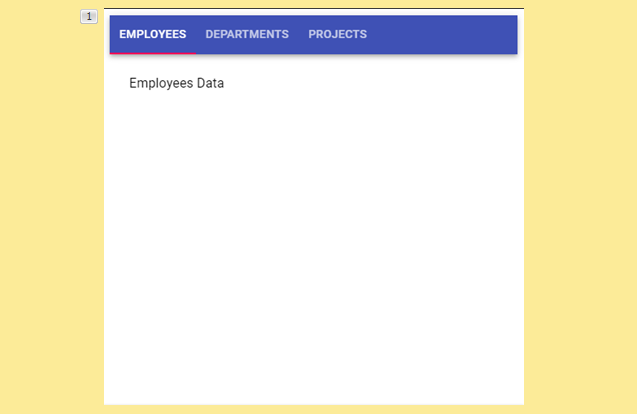
As like in this Example, we will show Employee Component when we are in Employee Tab, When we Click on Department Tab, we show the Contents of Department Component and When we Click on Project Tab, we will display the contents of Project Component.
To implement this kind of navigation within the single page of our application, we use the concept of Routing.
Routing enables navigation from one view to the next view (within the same page) as users perform different tasks.
Lets Open index.js file from our demo-project to understand how we can implement Routing in our demo-Project.
Till now we were creating all our Components in our index.js file for our ease of access.
We will create three different Components called as Employee, Department and Project. But now we will create them in separate javascript file.
Lets start with the first One that is Employee Component. Lets create a new javascript file in our src folder and we will name it as employee.js.
I have the Employee Component Code handy and Pasting it here.
We have to export this function from this script file, so that this function can be imported in the other script files where it is needed.
So we write export default Employee
We will repeat the Same for rest of the two Components as Well.
As we see here, we have created three different components in three different js files.
Now lets go to index.js file.
Lets create one Component Called as App. We will render this Component to our root container.
Save the changes, navigate to the browser.
We can see the output.
Now here, we wanted to Place three different links using which user should be able to Navigate to the respective Components. It can be Employee or Department or Project.
This is where we will make use of a concept Called as routing.
In Order to use Routing in our demo-project, we have to install Routing related Packages into our Project.
We use React-Router which is a Popular Library for implementing Routing for our Project.
Based on whether we are developing a Web App or Mobile App, we will install either react-router-dom or react-router-native.
For a web app, we’ll use react-router-dom
For a Mobile app, we’ll use react-router-native.
Since ours is a Web App, lets install react-router-dom from our node js command Prompt.
npm install react-router-dom
Now the Installation is Completed Successfully.
Lets run our demo-project using npm start.
Lets switch back to Visual Studio Code.
Lets import the required classes from react-router-dom in order to implement routing.
We are importing BrowserRouter, Switch, Route and Link. In a while we will understand the importance and usage of each one of this.
We will import our Employee, Department and Project Components as well.
Lets go to return method of our App Component.
Now we wanted the li elements to be shown as anchor tags so that user can navigate to different components by clicking on these anchor tags.
React Router provides a <Link> component to create links in your application. Wherever you render a <Link>, an anchor (<a>) will be rendered in your HTML document.
We wanted Employee Component to be displayed by default so, we just use / .
Now we will do the same for Department and for Project. But we change the value of to attribute. We access Departments Component by using /departments and Project component using /projects
Now we wanted someone to understand the url and display the respective component contents.
To each Route we specify the path and the component.
In order to enable the Routing for our App Component, typically we wrap our App Component in a Router.
React-Router-dom Provides BrowserRouter Component as the Router Component.
Save the Changes, navigate to the browser. We can click on different links and we see that we get the Contents of different Components.
As we click on each link, the url changes. We have configured that using Link Component.
employee.js:
import React from 'react';
import { useState, useEffect } from "react";

function Employee() {

  const [employees,setEmployees]=useState([]);
    useEffect(()=> {
      fetch("https://localhost:44306/api/Employee")
        .then(res => res.json())
        .then(
          (result) => {
            setEmployees(result);
          }
        );
    });

      return (
        <div>
          <h2>Employees Data...</h2>
          <table>
            <thead>
              <tr>
                <th>Id</th>
                <th>Name</th>
                <th>Location</th>
                <th>Salary</th>
              </tr>
            </thead>
            <tbody>
            {employees.map(emp => (
              <tr key={emp.Id}>
                <td>{emp.Id}</td>
                <td>{emp.Name}</td>
                <td>{emp.Location}</td>
                <td>{emp.Salary}</td>
                </tr>
            ))}
            </tbody>
          </table>
        </div>
        );
}

export default Employee
Department.js:
import React from 'react';
import { useState, useEffect } from "react";

function Department() {

  const [departments,setDepartments]=useState([]);
    useEffect(()=> {
      fetch("https://localhost:44306/api/Dept")
        .then(res => res.json())
        .then(
          (result) => {
            setDepartments(result);
          }
        );
    });

      return (
        <div>
          <h2>Departments Data...</h2>
          <table>
            <thead>
              <tr>
                <th>Id</th>
                <th>Name</th>
              </tr>
            </thead>
            <tbody>
            {departments.map(d => (
              <tr key={d.Id}>
                <td>{d.Id}</td>
                <td>{d.Name}</td>
                </tr>
            ))}
            </tbody>
          </table>
        </div>
        );
}

export default Department
App.js
import React from 'react';
import ReactDOM from 'react-dom';
import {BrowserRouter, Link, Switch, Route} from 'react-router-dom';
import Employee from './employee';
import Department from './department';
import Project from './project';

function App(){
  return(
    <div>
      <h2>Welcome to App Component...</h2>
      <ul>
        <li><Link to="/employees">Employees</Link></li>
        <li><Link to="/departments">Departments</Link></li>
        <li><Link to="/projects">Projects</Link></li>
      </ul>
      <Route path="/employees" component={Employee}></Route>
      <Route path="/departments" component={Department}></Route>
      <Route path="/projects" component={Project}></Route>
    </div>
  )
}

ReactDOM.render(<BrowserRouter><App></App></BrowserRouter>,document.getElementById("root"));
Video Reference:


© 2020 Pragimtech. All Rights Reserved.