Lifting State Up
Lets assume that we are doing online shopping using one of the e-commerce website or through a mobile app. Assuming you want to Order that Product.
Now this is the Page which is being displayed to you.
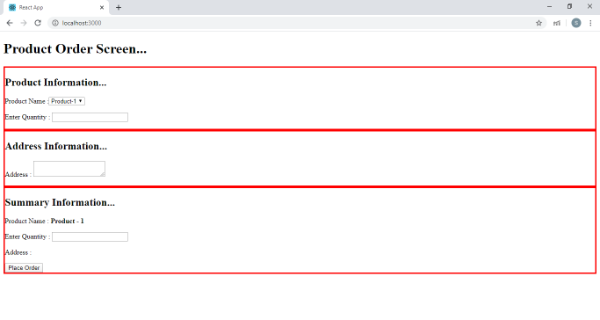
If we see this Web Page, it has three sections.
1. Product Information Section where User can select what is the product user is Ordering and the Quantity number required.
2. Address Section where User can enter the Delivery Address.
3. Summary Section. We display the summary details of the previous two sections here.
When a User Enters the Product details and Address details we display that information in the summary section. But assuming that we have a textbox available where User Can change the product quantity even in the Summary Section. Because just to change the Product quantity, we don’t want User to navigate all the way back to Product Information section. If we change the Quantity in Summary section, we want that change to be displayed in Product Information section and vice versa like how it is happening in this Web Page.
Now question is how can we develop this in React.
What we can do here is When we enter the Product quantity either in the Product Information section or Summary Section, rather than maintaining local state in the respective components, we can create a shared state in the closest common ancestor component of these two components and that state can be accessed and updated by both of these components.
This Concept is Called as Lifting State Up in React.
This way the data can be stored in the state by the Parent Component and we also meet other important principle that There should be a single “source of truth” for any data that changes in a React application.
In Order to achieve this, we will create four Components.
They are
1. Order Component
2. ProductInformation Component
3. Address Component
4. Summary Component
Order Component will be the Parent Component and the rest are Child Components to Order Component.
Lets Create Four Different Component Classes. Starting with Order Component. Lets add a constructor and this constructor accepts properties as a parameter and pass it to the base class constructor using super. Lets write render method.
We will copy this class and create the rest of three classes in the same way.
Now lets go to Product Information Component’s render method.
In our Product Information component, we have to place a dropdown where user can select the Product he wants and a textbox where he can enter the quantity.
return (

     <div style={{border:'3px solid red;'}}>

       <h2>Order Information...</h2>

       <p>

         <label>Product Name :

           <select>

             <option value="Product-1">Product-1</option>

             <option value="Product-2">Product-2</option>

             <option value="Product-3">Product-3</option>

           </select> </label>

       </p>

       <p>

         <label>Enter Quantity : <input type="text"></input></label>

       </p>

     </div>

   );
The product name what user selects and quantity data what user enters here should be accessible in the summary component.
If user makes any change for the quantity in summary component, that change should be displayed in this component. So we are going to store this input details in the Parent Component that is Order Component instead of storing it in the Current Component. This is where we are going to lift the state up. The value of this quantity input comes from the properties which are passed to this Product Component from Order Component. Order Component can instruct both the components to have values that are consistent with each other.
So we write value={this.props.quantity}
Whenever user makes a change to this input, we will pass that change to the Parent Component through properties. Lets add onChange attribute to this input and call a function where there is a change. I name that function as handleChange.
onChange={this.handleChange}
Now lets define handleChange function and with in this function, Assuming that ProductInfo Component receives a property called as onQuantityChange, and to this property we will pass the quantity value as an input.
this.props.onQuantityChange(e.target.value);
With this we are done with doing the changes required for our ProductInfo component.
Address Component will have the inputs required to provide our address. So assuming that we will place a multiline textbox using which we will enter the address information, whenever user enters the address we will store this address information as well in the Parent Component. That means whatever we have done for quantity input data in the ProductInfo component, we will repeat the same for Address.
Next lets move on to summary Component class.
In this component we will display the product name, product quantity and address details. For this demonstration, we will keep our focus on accessing quantity and address from the Parent Component. So I keep product name static.
Now lets display the Address first by accessing it using {this.props.address}
Now the quantity should be displayed in a textbox. And this should display the quantity value what user has entered in the Product Info section and any change on this input should reflect in the ProductInfo section.
So we repeat the same thing we have done for this input in the ProductInfo section. So I paste the same Code we have written for Quantity field in the ProductInfo Component and we handle the onChange event as well. And on change we update this value to the Parent Component that is Order Component.
Then comes the most important class that is our Parent Component which is OrderComponent.
Lets create a state object in the constructor of this class and to this state object we will add two properties. One is to store quantity value and the other one is to store address value. We initialize both of them to empty.
Lets implement two functions, one will be called when there is a change in the quantity and the other will be called when there is a change in the address. In both of these functions, we will update the respective details to our state object using setState method.
orderInfoChanged=(val)=>{

   this.setState({quantity:val});

 }

 addressChanged=(val)=>{

  this.setState({address:val});

}
Lets go to render method and we will call these three components one by one. Lets start with ProductInfo component. To this Component we have to pass the quantity and onQuantityChange as properties. Quantity will get the value from the state object quantity property and onQuantityChange will hold the orderInfoChaned function.
<ProductInfoComponent quantity={this.state.quantity}

    onQuantityChange={this.orderInfoChanged}></ProductInfoComponent >
Lets repeat the same for AddressComponent and Summary Component. To summary component we have to pass both quantity and address through properties.
Now lets call this OrderComponent and render this Component to our root container.
Save these changes, navigate to the browser. As we can see we have three sections. Fill the quantity and address, we can see that these changes are reflected into summary component. Now lets go to summary component, change the quantity. We can see that it gets updated into Product Info Component as well. For both Summary Component and Product Info Component, the quantity value is coming from Parent Component that is Order Component.
Both Product Info Component and Summary Component are sharing the state through Parent Component. This is what we call as Lifting state up.
import React from 'react';

import ReactDOM from 'react-dom';


class OrderComponent extends React.Component{

  constructor(props) {

    super(props);

    this.state={quantity:'', address:''};

 }

 orderInfoChanged=(val)=>{

   this.setState({quantity:val});

 }


 addressChanged=(val)=>{

  this.setState({address:val});

}

 render(){

   return(

    <div>

    <h1>Welcome to Product Order Screen...</h1>

    <OrderInfoComponent quantity={this.state.quantity}

    onQuantityChange={this.orderInfoChanged}></OrderInfoComponent>

    <AddressComponent address={this.state.address}

    onAddressChange={this.addressChanged}></AddressComponent>

    <SummaryComponent quantity={this.state.quantity} address={this.state.address}

    onQuantityChange={this.orderInfoChanged}></SummaryComponent>

  </div>

   );

 }

}


class OrderInfoComponent extends React.Component{

  constructor(props) {

    super(props);

 }


 handleChange=e=>{

   this.props.onQuantityChange(e.target.value);

 }

 render(){

   return (

     <div style={{border:'3px solid red'}}>

       <h2>Order Information...</h2>

       <p>

         <label>Product Name :

           <select>

             <option value="Product-1">Product-1</option>

             <option value="Product-2">Product-2</option>

             <option value="Product-3">Product-3</option>

           </select> </label>

       </p>

       <p>

         <label>Enter Quantity : <input type="text"  value={this.props.quantity}

         onChange={this.handleChange}></input></label>

       </p>

     </div>

   );

 }

}


class AddressComponent extends React.Component{

  constructor(props) {

    super(props);

 }

 handleChange=e=>{

   this.props.onAddressChange(e.target.value);

 };

 render(){

  return (

    <div style={{border:'3px solid red'}}>

      <h2>Address Information...</h2>

      <p>

        <label>Address : <textarea value={this.props.address} onChange={this.handleChange}></textarea></label>

      </p>


    </div>

  );

}

 }

class SummaryComponent extends React.Component{

  constructor(props) {

    super(props);

 }

 handleChange=(e)=>{

  this.props.onQuantityChange(e.target.value);

}

 render(){

  return (

    <div style={{border:'3px solid red'}}>

      <h2>Summary...</h2>

      <p>

        <label>Product Name : <b>Product - 1</b></label>

      </p>

      <p>

        <label>Product Quantity : <input type="text" value={this.props.quantity} onChange={this.handleChange}></input></label>

      </p>

      <p>

        <label>Address : <b>{this.props.address}</b></label>

      </p>

      <button>Place Order</button>

    </div>

  );

 }

}

const element=<OrderComponent></OrderComponent>

ReactDOM.render(element,document.getElementById("root"));
Video Reference:


© 2020 Pragimtech. All Rights Reserved.