Building a blazor form
In this video we will discuss how to build a form in Blazor with an example.
- We can use the standard HTML form and input elements to create a blazor form.
- However, Blazor comes with several built-in form and input components that make the task of creating a form much easier.
- These built-in blazor form components also support form validation. We will discuss validation in our upcoming videos.
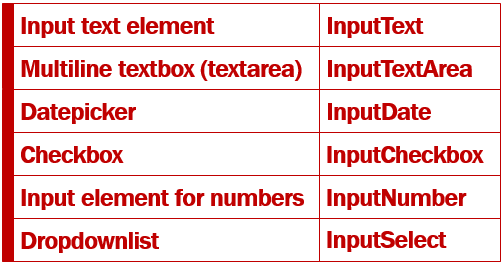
Blazor form input components
The following are some of the available built-in blazor form components
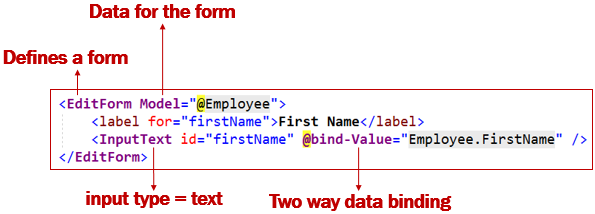
Blazor EditForm Component
- In Blazor a form is defined using
EditFormcomponent. - The
@Modelattribute specifies the data the form will bind to and work with. - In this example
Modelattribute value isEmployee, which is a property in the component class and carries the employee data the form will bind to and work with. - The
InputTextcomponent binds toEmployee.FirstNameusingbind-valueattribute. - This attribute provides two way data-binding. This means, the value in the
FirstNameproperty of theEmployeeobject is displayed in the input element. If we make a change to thefirstname, by changing the value in the input element,Employee.FirstNameproperty is automatcially updated with the changed value.
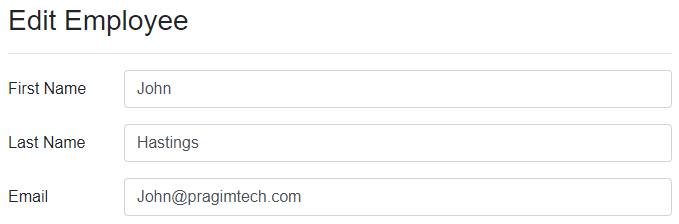
Edit Employee Form Example
We want our Edit Employee Form to look as shown below.
Edit Employee View (EmployeeDetails.razor)
Id in the page directive is the route parameter. This is the Id of the employee that we want to edit.
@page "/editemployee/{id}"

@inherits EditEmployeeBase

<EditForm Model="@Employee">
    <h3>Edit Employee</h3>
    <hr />
    <div class="form-group row">
        <label for="firstName" class="col-sm-2 col-form-label">
            First Name
        </label>
        <div class="col-sm-10">
            <InputText id="firstName" class="form-control" placeholder="First Name"
                       @bind-Value="Employee.FirstName" />
        </div>
    </div>
    <div class="form-group row">
        <label for="lastName" class="col-sm-2 col-form-label">
            Last Name
        </label>
        <div class="col-sm-10">
            <InputText id="lastName" class="form-control" placeholder="Last Name"
                       @bind-Value="Employee.LastName" />
        </div>
    </div>
    <div class="form-group row">
        <label for="email" class="col-sm-2 col-form-label">
            Email
        </label>
        <div class="col-sm-10">
            <InputText id="email" class="form-control" placeholder="Email"
                       @bind-Value="Employee.Email" />
        </div>
    </div>
</EditForm>
Edit Employee Component Class (EditEmployeeBase.cs)
Employeeproperty contains the employee data we want to edit.EmployeeServiceretrieves the employee details by ID.- The
Idproperty receives the employee id from the URL.
public class EditEmployeeBase : ComponentBase
{
    public Employee Employee { get; set; } = new Employee();

    [Inject]
    public IEmployeeService EmployeeService { get; set; }

    [Parameter]
    public string Id { get; set; }

    protected async override Task OnInitializedAsync()
    {
        Employee = await EmployeeService.GetEmployee(int.Parse(Id));
    }
}
Redirect to EditEmployee component
When the Edit button on DisplayEmployee component is clicked, it redirects the user to EditEmployee component. The Id of the employee to edit is passed in the URL as a route parameter.
<a href="@($"editemployee/{Employee.EmployeeId}")"
    class="btn btn-primary m-1">Edit</a>

© 2020 Pragimtech. All Rights Reserved.